
After a period of rest and reorganisation following the Gallipoli evacuation, the newly formed New Zealand Division left for France in early April 1916. Sent to the Flanders region to gain experience of new trench conditions, they spent the next three months guarding a ‘quiet’ sector of the line at Armentières before moving south to the Somme battlefields and their first large-scale action on the Western Front.
Key dates - 1916
- 1 March: NZ Division formed
- 11 April: NZ Division begins arriving in France from Egypt
- 13-14 May: NZ infantry enter the front line near Armentières
- 1 July: Battle of the Somme begins
- 20-22 August: NZ Division moves south to the Somme
- 15-22 September: NZers capture Switch and Flers trenches during Battle of Flers-Courcelette
- 25 & 27 September: NZers attack Goose Alley and Gird trenches during Battle of Morval
- 1 October: NZers help extend line during Battle of Transloy Ridges
- 5 October: NZ infantry pulls out of the line
- 10-11 October: NZ Division returns to Flanders
- 25-26 October: NZ artillery withdrawn
- 18 November: British high command ends the Somme offensive
A truly nightmarish world greeted the New Zealand Division when it joined the Battle of the Somme in early September 1916. The division arrived to take part in the third big push of the offensive, designed to crack the German lines once and for all. When it withdrew from the line a month later, a decisive breakthrough had not been achieved.
Eighteen thousand members of the division went into action. Nearly 6000 men were wounded and more than 2100 lost their lives. Over half New Zealand‘s Somme dead have no known grave – their names are on the New Zealand Memorial to the Missing in Caterpillar Valley Cemetery, near Longueval. New Zealand brought one of these men home in November 2004; his remains lie in the Tomb of the Unknown Warrior in the forecourt of the National War Memorial in Wellington.
The battle was a pivotal event in the Great War. In retrospect, it laid the basis for the Allied victory two years later, though at huge cost. Ten decades on, the numbers still have the power to shock. At the end of 4½ months of fighting, some 1.2 million men were dead or wounded; about 8500 casualties for each of the 141 days of conflict. Some days were especially costly. The opening day of the offensive, 1 July 1916, was arguably the worst day in British military history: 19,000 men were killed and another 38,000 wounded. By the end of the campaign on 18 November 1916, the Allies had advanced, at most, 10 km into German-held territory – a distance a fit young man can run in less than an hour.
Armentières: the quiet sector
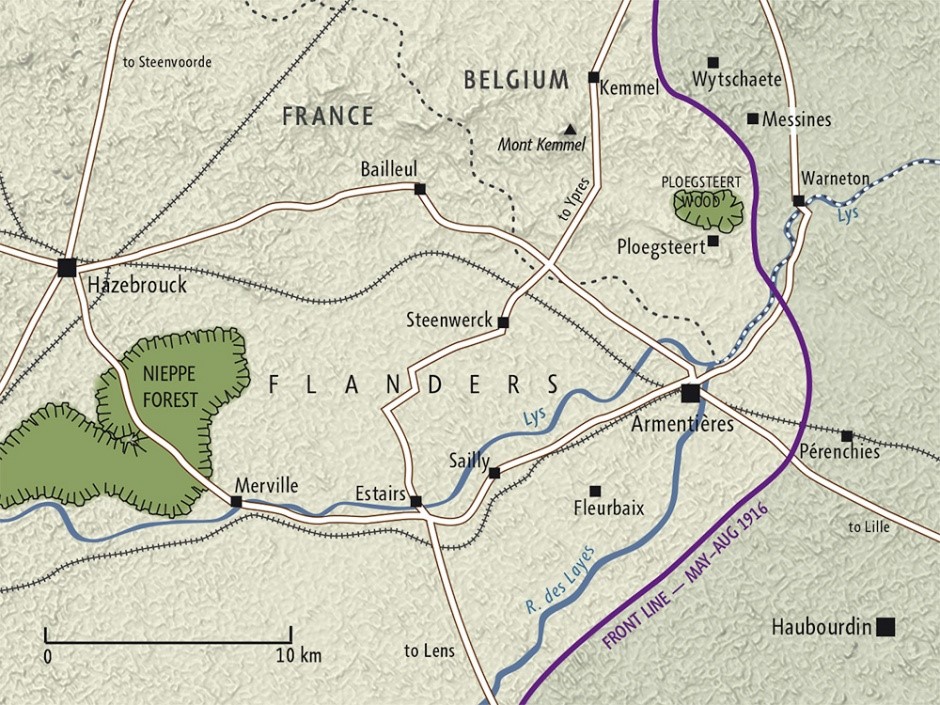
Armentières sector 1916 (Geographx)
The New Zealand Division began arriving in Marseilles on 11 April 1916. The men had no time for sightseeing, immediately boarding trains north to Flanders where the British Expeditionary Force (BEF) was concentrated. After a three-day journey, the New Zealand soldiers set up camp around the town of Hazebrouck.
The New Zealanders were soon introduced to the new tactics that had been developed by the BEF during 18 months of fighting. Officers and NCOs attended courses on grenades, trench warfare, and machine-gunnery, amongst other things, so they could circulate new ideas to the ranks as soon as possible.
The BEF also used pamphlets and circulars to disseminate information. New Zealand officers had to read and absorb far more official material than they had been required to in Gallipoli or Egypt. Censorship increased, and rules tightened around the use of personal cameras in the front line (private photos of the Western Front are very rare compared to those of Gallipoli).
A new environment also meant new equipment. The New Zealanders received British-made ‘PH Hood’ gas masks for protection against chlorine and phosgene poison gases, and everyone had to practise new gas drills and attend live demonstrations at British gas warfare schools. New Zealand soldiers began wearing the new rounded ‘Brodie’ pattern steel helmet and, unlike at Gallipoli, were well supplied with grenades – Mills Bombs. Each battalion was equipped with eight Lewis Guns, significantly bolstering the firepower of New Zealand infantry.
Retrained, reorganised and re-equipped, the New Zealand Division moved to a ‘quiet’ sector of the front near the town of Armentières to gain experience in the trenches. The trench systems here were stable and well-designed, although prone to flooding due to the low water table. A support line 180 m behind the front line was backed up by another 540 m back; the three lines were linked by a maze of communication trenches, which allowed men to move between them under cover. Observation posts, machine-gun posts and other strongpoints were sited at carefully chosen spots, and dugouts provided shelter from the elements. Belts of barbed wire protected the British lines.
The New Zealand Division was integrated into the British garrison system. Only two of the division’s three brigades (increased to four in 1917) were in the trenches at one time. The third was stationed in reserve in Armentières, as was divisional headquarters. Each brigade spent 10–14 days in the trenches, followed by a week in reserve.
As the New Zealanders grew accustomed to their surroundings, they began sending out patrols into no-man’s-land and launched a series of aggressive trench raids against the German lines in their sector. During three months at Armentières, the New Zealand Division made 11 trench raids and was the target of four. A raid by the 2nd Rifles Battalion on 24 June was a textbook success: a 73-strong raiding party supported by artillery and mortars killed 29 Germans and captured nine prisoners. In contrast, a raid by the 1st Otago Battalion on 13 July was a total failure. Forewarned, the Germans ambushed the Otago men as they crossed no-man’s-land. Devastating artillery and machine-gun fire killed or wounded 163 of the 181-man raiding party.
In late August, the entire division withdrew from Armentières and moved south to the Somme. Here it joined XV Corps of the British Fourth Army, which was still waging a bloody offensive begun the previous month.
Somme battles 1916: prelude
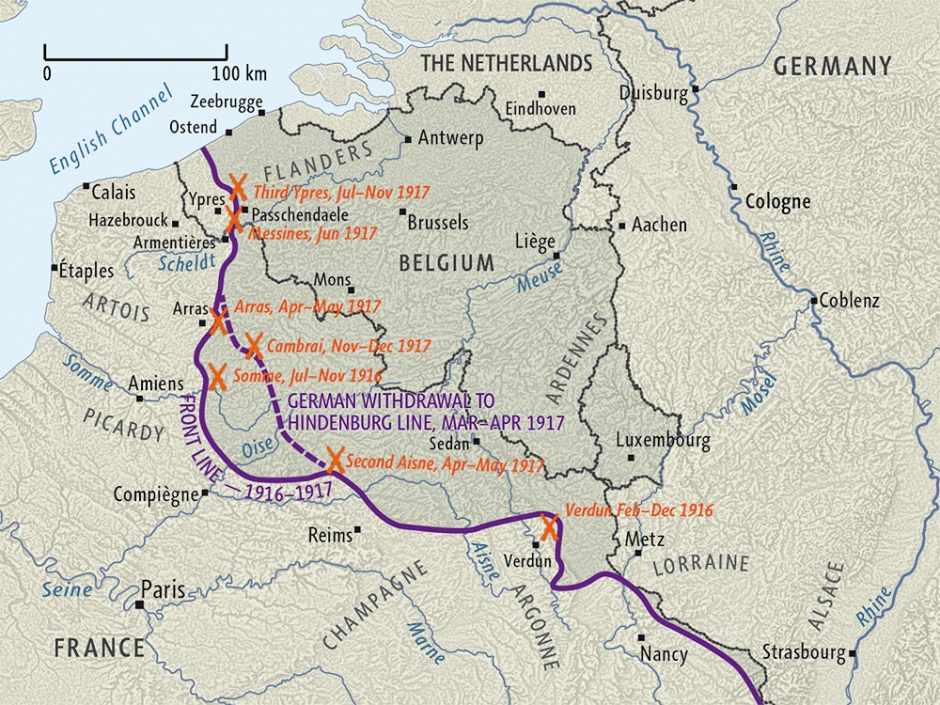
The Western Front 1916-17 (Geographx)
Somme battles 1916: July-September
Sir Douglas Haig, the British Expeditionary Force’s commander-in-chief, oversaw preparations for the offensive. The opening stanza would be a five-day preparatory bombardment of the enemy line (bad weather would extend this to seven days), expected to leave the defenders incapable of resisting the waves of infantry that would follow. Once the line was breached, waiting cavalry divisions would charge into the German rear areas. The trench warfare stalemate would be permanently broken.
The plan failed on several counts. A breakthrough was never going to happen in the conditions existing in 1916. The preparatory bombardment alerted the Germans to the impending attack, giving them the opportunity to move reserves to the threatened area. These were in position to fill any gaps and prevent a decisive advance even if their forward lines broke.
As more than 1½ million shells rained down on their positions, the defenders of the German front line had a hellish experience. But, contrary to British and French expectation, the preparatory bombardment failed to disable them. They cowered in their deep dugouts, virtually impervious to the shelling. Despite its ferocity, much of the bombardment consisted of shrapnel shells, which were ineffective against men in shelter. When the shelling finally stopped, the Germans had ample time to emerge from their bunkers and take up position behind their machine guns as the waves of Allied infantry came across no-man’s-land towards them.
The Allies’ inability to suppress the enemy’s artillery compounded this failure. Locating enemy batteries would become an essential prerequisite for attacks later in the war, but in 1916, both sides were still developing the means to do this. For the time being, aerial spotting was the prime method. On 1 July, many enemy batteries were still in a position to pour fire on infantry advancing in the open.
The result was a tragedy of unparalleled proportions. On 1 July, men from 11 British and six French divisions ‘hopped the bags’ and headed towards the German lines. Shrapnel shells were soon bursting above them. Machine guns added to the carnage, cutting swathes in the long lines of infantry. Mere flesh never stood a chance. By the end of the day, nearly 60,000 British men were wounded, dying or dead.
Despite the heavy toll, the attack made progress in the southern sector. Both the French and the rightmost British corps managed to secure part of the German first line. Haig decided that this ‘success’ should be exploited by pushing forward to the next line in this sector (the German defences consisted of three lines, with a fourth being constructed behind them as further insurance against a breakthrough). On 14 July, a major push managed to secure part of the German second line. This effort was notable for an important tactical development — the creeping barrage, which provided a curtain of fire in front of the infantry as they crossed no-man’s-land.
Somme battles 1916: September-November
With part of the German second line breached, it now seemed to Haig that a final breakthrough had become feasible. Capturing the third line and breaching the much weaker fourth line would open the way for the Allies. This would be the objective of a third major push on 15 September. Hopes were raised by the advent of a new weapon — the tank — that would support the infantry as they crossed no-man’s-land.
This renewed assault, which involved 11 divisions (including the New Zealand Division), made further inroads into the German defence system. Part of the third line was breached, and in further attacks in ensuing weeks troops managed to grab parts of the fourth line. But the Germans always had sufficient reserves to plug gaps and prevent the hoped-for breakthrough. Despite proving useful at times, especially in crushing enemy barbed wire, the tanks failed to have a decisive impact. They were, at this stage, too few, too ponderous and too vulnerable to artillery.
For the troops involved, the new push rapidly became a nightmare. Rain from the second day quickly turned the shell-torn battlefield into a quagmire. Soldiers huddled in their trenches, sometimes knee-deep in mud and often without proper cover.
During October and November, the Allies continued to nibble away at the German defence system. Small gains were made in places, but nothing that offered hope of a breakthrough. After a final push, which secured Beaumont Hamel, Haig shut down the offensive on 18 November.
At huge cost, the 4½-month British and French effort had pushed the line forward about 10 km. In one sense, the offensive was an abject failure. The fact that no killer blow had been landed dashed expectations that this battle would end the war.
But in another sense the battle did play a key role in the ultimate Allied victory. Industrialised warfare ensured that no victory was possible while either side maintained sufficient reserves to prevent breakthroughs. Only attritional warfare could reduce these reserves, and the Somme battle had been hugely attritional. While the Allies had suffered more than 600,000 casualties, Germany’s losses were equally serious, estimated at between 450,000 and 600,000.
Losses on this scale, coming on top of the Verdun bloodbath, left the Germans unwilling to face a resumption of the Allied offensive in the spring of 1917. Early that year they abandoned the Somme battlefield, pulling back some 40 km to a formidable defence line prepared over the winter, the Hindenburg Line. The losses suffered by the Germans on the Somme became more significant shortly after this withdrawal with the entry of the United States into the war. While the Allies could look forward to an eventual huge boost in their numbers on the Western Front, the Germans struggled to refill the ranks of their depleted battalions. Little wonder that the Somme was described as ‘the muddy grave of the German field army’.
Impact of artillery
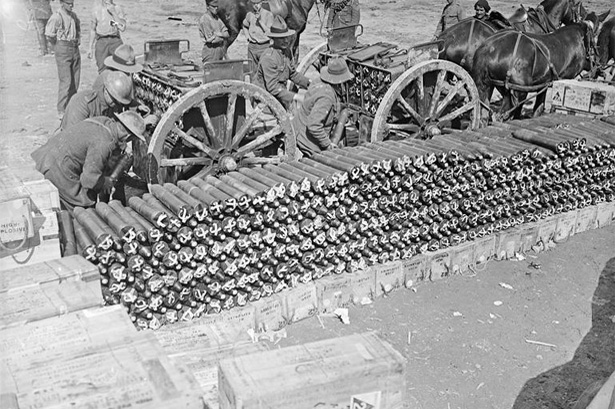
New Zealand gunners loading artillery shells onto limbers near Albert, September 1916 (© IWM Q1250)
On the Somme in 1916, New Zealand troops experienced the full horror of industrialised warfare. While machine guns were lethal for troops in the open, artillery ruled the static battlefields along the Western Front. The war was characterised by not only a growing scale of artillery but also increasing sophistication in its use.
The gunners shaped the battlefield. Relentless shellfire reduced villages, woods and fields to drab wilderness. No-man’s-land became so featureless that it was easy to get lost and blunder into the enemy’s lines.
The development of quick-firing guns able to deliver large quantities of high-explosive shells made such a war possible. The harnessing of economies to the demands of total war from 1914 enabled the deployment of growing numbers of these guns. Initial problems with shell supply were overcome during 1915. Massive munitions stocks were increasingly available: the BEF received 16 million shells in the second half of 1915. The war had become a clash between machines as much as between men.
Creeping barrage
The Battle of the Somme saw the successful use of the creeping artillery barrage. This tactic involved using artillery to minimise the danger from enemy machine guns while troops crossed no-man’s-land. A curtain of fire shielded the troops as they approached the enemy line, and prevent enemy machine-gunners taking up position to fire on the approaching attackers.To protect themselves from both machine-gun and artillery fire, the troops had no alternative but to go below ground level. Both sides dug for their lives. During 1915, trench systems grew ever more complex, with specific styles for front, main, reserve and communication trenches. The Germans dug deep dugouts, which would serve them well when the Allies attacked them on the Somme. The Allies, committed to pushing the enemy out of France and Belgium, developed far less extensive underground works, on the assumption that they would soon be moving forward.
Although artillery was essential to any attack, men on foot had to secure the ground. They faced seemingly impossible odds. Many were killed before an attack even began by shells landing in the assembly trenches. Both sides also fired poison-gas shells when the wind was blowing in the right direction. After going over the top, or ‘hopping the bags’ as the troops called it, the advancing infantry often had to negotiate their way through mud and shell craters. Facing them were extensive barbed-wire obstructions, hopefully so shattered by artillery fire that they could be easily penetrated.
New Zealand's Somme experience

The New Zealand Division on the Somme, 1916 (Geographx)
The Battle of the Somme was New Zealand’s first major engagement on the Western Front and remains its mostly costly. It took a huge toll on the 18,000 members of the New Zealand Division who were involved. More than one in nine of the New Zealanders who fought on the Somme were killed, and about one in three were wounded. Whereas New Zealand’s eight-month campaign at Gallipoli had cost nearly 2800 lives, more than 2100 men were lost in just 45 days on the Somme. Scores more were killed while fighting as members of British imperial units.
The New Zealand Division was one of 55 BEF divisions that took part in the battle. It moved south and joined the Fourth Army’s XV Corps in early September. On 10 September, the division moved into the line between High and Delville woods. The infantry found the sappers and pioneers busy digging communication trenches in readiness for the assault.
The gunners were also already in action. They had entered the line on the night of 5-6 September. They began preparing advance positions to support the attack and worked on their fire-plan for the assault. In addition to standing barrages on the objective line, 16 guns (a puny number compared with attacks in 1917) would provide a creeping barrage that moved forward in a series of lifts at a speed calculated to allow the infantry to follow it closely. On 12 September, the New Zealand gunners joined the preparatory bombardment.
All was in readiness when the men of the assault battalions moved into position during the night of 14-15 September. Morale was high, but the soldiers did not know what to expect, ‘and perhaps it was just as well that we did not’. The Somme would be a very different battle from the one New Zealanders had fought on Gallipoli. Poison-gas shells, relentless artillery fire and a highly professional opposition would take a physical and psychological toll.
The New Zealand infantry ‘hopped the bags’ at 6.20 a.m. on 15 September. Their immediate goal was the German Switch Trench, about 400 m away. Once 2nd Brigade secured this line, 3rd Brigade’s four battalions leapfrogged through to seize the portion of the German Flers trench system (the German third line) that lay in the New Zealand sector, just to the left of the village of Flers. They also helped secure Flers, which had been taken earlier by the neighbouring British division. The riflemen were unable to secure the final objective, Grove Alley, a communication trench along a spur behind the Flers support line, an attack which involved a wheel to the left. This position would be taken next morning by troops of 1st Brigade, which had followed the other brigades forward.
Donald Brown VC
Donald Brown, 2nd Otago Battalion, was the only member of the NZEF to be awarded a Victoria Cross in 1916. On 15 September and 1 October, Brown displayed ‘utter contempt for danger and coolness under fire’ during the capture of key German machine-gun positions. He was killed on 1 October when a machine-gun bullet hit him in the head. Two other soldiers with New Zealand connections won VCs on the Somme while serving in other forces: Thomas Cooke (8th Battalion, Australian Imperial Force) and Bernard Freyberg (Royal Naval Division).Although a successful assault, it was, like all set-piece Western Front attacks, very expensive. Of the roughly 6000 infantry involved, some 1200 were wounded or missing and about 670 were dead or dying. Among the casualties were 52 members of the Pioneer Battalion (which included the Maori Contingent), which was helping to build vital communication trenches under heavy artillery fire. At the time, this was the greatest loss of life in a single day in New Zealand’s post-1840 military history, but in 1917, the horrors of Passchendaele would surpass this dubious record.
Although significant progress was made on 15 September, the hoped-for breakthrough remained elusive. In the following three weeks, the New Zealand Division made three more assaults – on 25 and 27 September, and 1 October – and grabbed part of the German fourth line (the Gird Trench system). These attacks, coupled with the incessant German artillery bombardment, began to take their toll on the men.
Sickness spread, and exhausted men wondered what they were becoming: ‘I shook off our conditioned callousness, shook off the feeling, now taking root, that this world of arbitrary violence and random death was the real world, and that justice, mercy, peace and love were phantasms that had never been.’ Cold was added to exhaustion and, once the rain began on 16 September, a wetness that soaked to the bone.
Although encouraging progress had been made, no breakthrough was in sight when, on 5 October, the New Zealand Division began to pull out of the line. For the soldiers, the end of the battle could not come soon enough. Rifleman Sidney Gully described some of his fellow soldiers as ‘half demented during the last couple of days. Unshaven, unwashed, covered in mud and lastly but [not] leastly almost devoid of energy and only half fed’.
Short-term exhaustion, soon overcome with rest, was matched by a sense of satisfaction. The New Zealand troops had been through the crucible of what they considered real warfare (on a different scale to Gallipoli) and emerged with flying colours, highly praised by British generals. They believed they had the measure of the Germans, and looked forward to a resumption of the offensive in the following spring.
The New Zealand Division now returned to Flanders, where they helped man the sector of the front line near Armentières and Sailly-sur-la-Lys. As troops recovered from the ordeal of the Somme, reinforcements arrived to bring units back to full strength. By late October, the onset of winter brought further challenges to morale and well-being.
Remembering the Somme
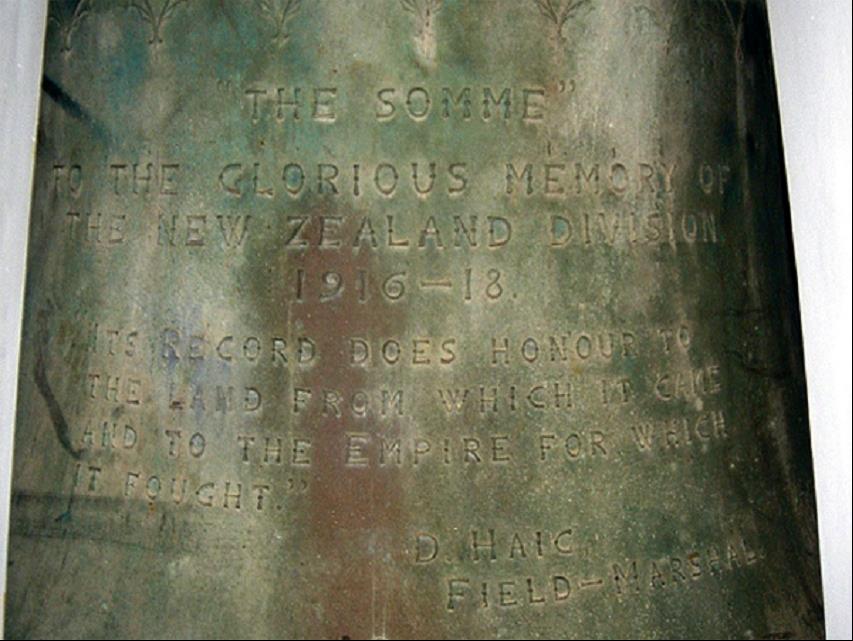
The Somme bell at the National War Memorial Carillon (Ministry for Culture and Heritage)
New Zealand’s losses on the Somme were felt for years to come. One casualty there meant mourning or suffering for entire families and communities at home. These men were more than soldiers; they were also sons, fathers, brothers, husbands and lovers. To this day, countless families and communities in New Zealand carry scars on their hearts from the bloody battlefields of the Somme.
More than 2100 New Zealanders are buried on what was once the battlefield of the Somme or near the sites of casualty clearing stations or hospitals behind the lines. Those with known graves now lie in carefully tended Commonwealth War Graves Commission cemeteries throughout the area.
Carillon bells
Amongst the 74 bells of the Carillon at New Zealand’s National War Memorial are several commemorating the 1916 Somme battles. Their names echo the places where the New Zealand Division fought and fell in 1916: Delville Wood, Flers, Longueval, Mametz, Fricourt and High Wood. The bell ‘The Somme’ is there too, dedicated ‘To the Glorious Memory of The New Zealand Division, 1916–18’.More than half the New Zealanders who died on the Somme in 1916 have no known grave. Some, unidentified, lie in cemeteries with their headstones inscribed ‘Known unto God’; the rest remain lost on the battlefield. The names of all of these missing soldiers, more than 1200 in all, are inscribed on the New Zealand Memorial to the Missing in the Caterpillar Valley Cemetery, west of the village of Longueval.
New Zealand’s Tomb of the Unknown Warrior at the National War Memorial in Wellington contains the remains of a New Zealand soldier who was killed on the Somme in 1916 and buried in a ‘Known unto God’ grave in Caterpillar Valley Cemetery. The remains were interred in the tomb in November 2004.
Further information
This web feature was written by Bronwyn Dalley and David Green and produced by the NZHistory team. It was revised and updated by Ian McGibbon and Gareth Phipps in 2016.
Links
- Battle of the Somme (BBC History)
- Battle of the Somme (Imperial War Museums)
- General Sir Douglas Haig’s 2nd dispatch about the Somme, 23 December 1916 (firstworldwar.com)
- Battle of the Somme (Wikipedia)
- Western Front, 1916 to 1917 (Te Ara)
- NZEF First World War cemeteries map - Western Europe, UK and Ireland (NZHistory)
Books
- J.R. Byrne, New Zealand artillery in the field 1914–18, Whitcombe & Tombs, Auckland et al., 1922
- Damien Fenton, New Zealand and the First World War, 1914–1919, Penguin, Auckland, 2013
- Andrew Macdonald, On my way to the Somme: New Zealanders and the bloody offensive of 1916, HarperCollins, Auckland, 2005
- Ian McGibbon, New Zealand’s Western Front campaign, Bateman, Auckland, 2016
- Ian McGibbon, The Western Front: a guide to New Zealand battlefields and memorials, Penguin, Auckland, 2015
- Christopher Pugsley, The ANZAC experience: New Zealand, Australia and empire in the First World War, Reed, Auckland, 2004
- H. Stewart, The New Zealand Division 1916–1919, Whitcombe & Tombs, Auckland et al., 1921